site stats
Photoshop Photo Editing | Image Retouching | Background Remove | CutOut: shadow effect
Showing posts with label shadow effect. Show all posts

How to create a water ripple effect with Photoshop

January 25, 2019

Water ripple effect


In this Photoshop tutorial, we'll learn how to easily add a realistic water reflection to any photo. It also seems a water ripple effect. It’s a very simple effect to make and you can add it to any photo you like, though it tends to work best with imagery that doesn't already contain water in them

#shadow_effect #mirror_shadow_effect #shadow_service #reflection_shadow #drop_shadow #reflection_effect #mirror_effect #water_reflection_effect #mirror_image #water_ripple_effect #photoshop_water_color_effect #photoshop_shadow_service #creating_shadow_service #shadow #shadow_effect_tutorial #shadow_making #photo_editing #photo_retouching #photo_editing_service


If you are interested in this article visit here

How to create water reflection in Photoshop with water ripples

May 28, 2018


Water reflection is a cool consequence that can be added effortlessly to any portrait. Rather we can say it’s similar to mirror effect which just a shadow of an original portrait.


Make a clone of the background image and flip it upside down by the original photo and add some extraordinary effects to give it a natural reflection is also referring reflection shadow no matter what the location is.

Tutorial: 


Step: First of all, Open an image and go to canvas to enlarge the image for creating a reflection

Step: Press (ctrl+j) twice to duplicate it layer 2 & layer 2 copy. Drag layer 2 copy to new canvas we created

Step: Probably, you need to transform it for better output. So that Zoom out the image to transform and select perspective.

want to know more about tutorial ?? Visit Here for details

Photoshop mirror shadow effect tutorial for image editing

May 02, 2018


Mirror shadow 

Mirror shadow effect is the high standard shadow effect which is generated side or below of the main Object

When anyone walks beside river or Pond or we can put any object in front of Glass, We must observe a shadow and this shadow effect is called mirror shadow effect

For photo editing information contact info@clickartbd.ca


Therefore, Mirror shadow effect in which one half of a photo is turned into a reflection of the other half can be achieved in just a few steps with Adobe Photoshop tools

Tutorial-

Step: Copy object on another canvas which is transparent. Apply color on new canvas as the background

Step: Select a layer and copy it new layer named shadow. After that click on bounding box to apply flip vertical

Step: Press shadow to add the layer mask on the object copy layer to apply gradient effect


How to apply Drop shadow of Human on a photograph

March 16, 2018


Drop Shadow Of Human


The traditional utilize for a drop shadow is to imitate 3D depth in a 2D image. This is done by create an offset shadow at the back an object to point out that the object is on the edge above the background in 3D space.


Below you will observe an example of how a drop shadow can designate how big the light source is and where it is coming from, as well as how far away an item is from the background. By changing only the setting of the shadow, you can radically modify the look of a photograph

Step 1: Choose a nice background for the applied tutorial


Step 2: Pick a object layer for layer 1


Step 3: Make sure the object layer must be on the transparent background


Step 4: Select layer 1 and select (fx) option for the drop shadow on the layer panel


Step 5: After opening the drop shadow box set opacity 50% and size 10 pixels


Step 6: Select drop shadow filter layer and right click on the layer to active create layer


Step 7: Now if you hide you can see the shadow is create on the layer so perfectly


Step 8: select layer 1 drop shadow and active show transform controls to transform the objects shadow behind


Step 9: Transform the shadow on the drop portion for the object


Step 10: Place it correctly so that it look so natural 


Thanks for visiting our Tutorial

You can visit our another BLOG


Image Editing Software Adobe Photoshop & Its Advantage Disadvantage

December 07, 2017

Adobe Photoshop including positives negatives


Adobe Photoshop is something major photo retouching and manipulation software in the marketplace. Its use variety from full feature editing of huge batches of photographs to create elaborate digital painting and artworks that impersonate persons done by hand


Adobe Photoshop advantages which can amaze us


Adobe Photoshop is amazing, which used to edit the digital image application, It helps you develop the worth of a photograph, It is the assistant with the artists who rely on Photoshop to compose the artwork and the students can be taught Photoshop in Image Editing classes.

The imagery can be distorted to fix the fault, the photographs can be given an expert seem when a standard camera is used, new artwork images can be shaped and shortened

It is very easy to begin managing the photos, Adobe Photoshop helps out you to decrease the red-eye or to whiten the teeth with the click of a button, you can adjust the skin tones of people in your pictures.

Most of the edit frequently done on the photo can be fulfilled with a single click, there is no professional training is desired to absolute the complex tasks like adjust skin tone.

You can employ Adobe Photoshop to set up the videos & the photos into the software hastily and easily, Everything will be prepared in a precise & arranged way on your screen, when you are covenant with hundreds or thousands of photo and videos, It will be easier to discover the ones you require and use them, So, It is simple to grip numerous videos and images


For your better understanding, we generate the positives and negatives in a shortcut-


 PS Pros & Cons 


Adobe Photoshop negative issues we should aware


Adobe Photoshop is comparatively easy to employ but it is not a program planned for the beginners, It is mainly a photo-editing program for the professional that preparation on editing many photos on a standard basis, There are a lot of dissimilar tools that do very unlike things, so, You will take extensive instance to study how to utilize each one properly.

Adobe Photoshop is not free, it is proprietary software, meaning its resource code is a secret, the Source code is the code in which any PC program is printed by the human being and programmers.

Adobe Photoshop is comparatively costly, When compare with further photo-editing software, It has a lot of skin texture and it is thus regarded as the manufacturing average in the graphic designing, You will expend much more for Adobe Photoshop, If you do not make a plan on inhibition the photos every day.

Most beginners will not begin to touch the functionality of this program and they could get what they need from another program, many people who are unfamiliar with editing the photos in Adobe Photoshop, The advanced functionality will be useless for them.

There are some graphics designers who have no good intention regarding Photoshop software. They misuse all the tools to use the photograph for negative perception and to harm people indirectly. They also can exploit are free and lower cost graphics which is a great threat to our modern age, Photoshop offers.

We can add a fact that, Adobe Photoshop involve a contented computer, It is a long-lasting program and many of the tools are computationally concentrated, It takes up a huge gap of space on your PC as well as RAM memory.

To know more editing related services visit our Blog


14 Steps Of Applying Mirror Effect By Photoshop On An Object

November 22, 2017


Mirror Shadow

Mirroring Effect is something which is created on exact in front or opposite of an Object. It show the whole surface of that main object. Which plays a simple soften blackish layer. Mirror effect allows a image to present a professional look.

When the proportion of the color isn’t right in any image, Shadow effect with Adobe Photoshop can create a drastic change so easily. Highly experienced designers create these Shadows with Adobe Photoshop According to Buyer Requirements.

Today we are going to show you how we can apply mirror effect to make a image more than realistic.After completing the editing ,object transform in totally different image.Here is a example of e transform-


Now you will be showed how this object is transform into this optimistic image

Before start to the work we have to use Clipping Path. If you miss that Article you can find it out here 

Step by Step process is given below-


Mirror Effect


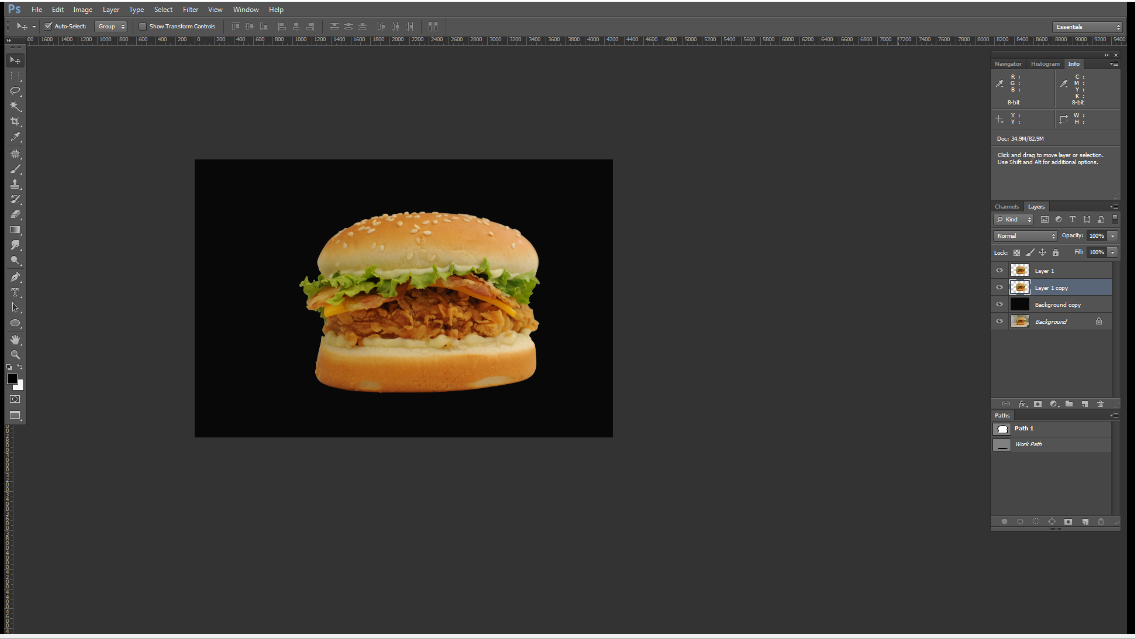
Step 1 : For applying mirror effect keep the main object layer and background copy layer to change the background with black color


Step 2 :Copy layer 1 and put exact under the top object layer 1


Step 3 :Select layer 1 copy to make select the object > right click > flip vertical


Step 4 :Move it down from the object to make a mirror effect


Step 5 :Now again place the layer 1 copy on the first order of the layer panel exact up before layer 1 object layer


Step 6 :Selecting layer 1 copy and adjust shadow with liquefy by pressing (shift+Ctrl+x)


Step 7 :Again replace layer 1 copy under the main object layer 1


Step 8 :Select layer 1 copy to identify the area of reflection area to scaling angle radius to give it more optimistic and original mirror look


Step 9 :Just after changing the angle decrease opacity as we need


Step 10 :Go to layer 1 again and select the bottom area of the object to copy the area in layer 2


Step 11 : Select layer 2 and change lightness effect (-100) to create drop shadow of the object more darken


Step 12 :Then go to filter > Blur > Gaussian blur > 29.1 > OK


Step 13 : Moving layer 1 copy to change the opacity level of the shadow to give the final touch to converting it into so natural outlook


Step 14 : Like the same process again press (Ctrl+E) to merge all the layer and save JPEG image


In our next session of Article, we will give you idea to adjust color of an image to giving its a professional look

 Ask questions if you have necessary inquiries regarding this Blog. If you want to get more idea  about photo editing you can visit Our Another Blog 


Thanks to visit this Article

We will keep sharing Articles for your betterment on Graphic Design.


How To Create Reflection Shadow In 16 Steps On Any Object With Photoshop

November 21, 2017

Reflection shadow

The general use of shadow effect to make the object productive, Beautiful, Natural and draw attention from the audience. Because of that ,there is no other shadow effect is as much as attractive as a reflection shadow to represent a decorative product. In a particular way, Reflection shadow is normally created on the basis of Reflection like product shadow below the Glass or Water.

Now we are going to discuss proper steps of creating Reflection Shadow on the basis of previous Writting 

Our final outcome of editing will be like this-


Now we are starting...... please read all the steps discussing below and try to make a good reflection shadow yourself.


Step 1 :   Copy the object after creating clipping path as a layer 1 which we called object layer


Step 2 :  Copy background layer and give white color background as a layer


Step 3 :   Go to layer 1 and make a path with pen tool for making reflection shadow surface


Step 4 :  Press (Ctrl+T) to select the already draw path


Step 5 :   Select background copy layer and press (shift+6) to adjust feather radius (10)


Step 6 :   Select background copy layer and press (Ctrl+c)+(Ctrl+v) to copy the create path of shadow in layer 2


Step 7 :  Again selecting layer 2 press (Ctrl+U) to adjust hue/saturation and decrease the lightness level (-100)


Step 8 :   Take Eraser tool to adjust the shadow area and erase what we don’t need to keep on the object surface


Step 9 :   Select layer 1 and the bottom area of the object


Step 10 :   Copy the select bottom area on layer 3


Step 11 :  Select bottom area again and right click to go > Flip vertical


Step 12 :  Place the flip horizontal area to a perfect order to make the further edit


Step 13 :  Press (shift+Ctrl+x) to modify the area with liquefy tool to make adjust with the previous object to put on a reflect shadow


Step 14 :  After adjusting with liquefy decrease 60% opacity on top right corner of the layer panel


Step 15 :  Select eraser tool to make the shadow more realistic by remove to adjust the created
 shadow


Step 16 :  Merge all the layer and save the JPEG format


In our next session of Article, we will give you proper step by step process to creating a Mirror Effect which will be more interesting to applying on any object in Photoshop

Lets be free to ask questions if you have any inquiries regarding this Blog. If you want to learn  more about photo editing you can visit Our Another Blog 


Thank you for reading this tutorial


Drop Shadow applying process just in 8 steps with Photoshop

November 21, 2017

Drop Shadow


Drop Shadow is created Under an Object. Sometimes shadow is not present on the original image of product or something advertising materials. On that time, we add Background with main Object; this is created a Shadow with Photoshop tool and makes the Realistic image. For looking lucrative to any image in the Background we must need to use Drop Shadow with Photoshop and amend with Background.


Here we are giving a step by step tutorial to create a Drop Shadow on a object surface


Step 1 :  For drop shadow we need to open the desire object image and draw a area with pen  tool as  path we need to make as shadow.


Step 2 : Selecting background layer press (shift+6) go operate feather radius (15)


Step 3 :    Then copy the path area in layer 2


Step 4  :  Create new layer by clicking the new layer icon on bottom of the layer panel as layer 3


Step 5 :  Selecting layer 3 change in white background color


Step 6 :   Again select layer 2 which is a path layer we need to play Hue/Saturation  by pressing
                (ctrl+U) and adjust saturation (-52)


Step 7  :   Press(ctrl+E) to merge all the layer together


 Step 8 : Save JPEG file of the image 


Next we will discuss about how to play Reflection Effect on an image background. If missed previous blog about Natural shadow here for your review

If feel any query please do comment and make clear conception. 


Here is our another Blog


Thank you for getting idea from our Article


Copyright © Photoshop Photo Editing | Image Retouching | Background Remove | CutOut. Designed by ClickArt Bd