Mirror Shadow
Mirroring Effect is something which is created on exact in front or opposite of an Object. It show the whole surface of that main object. Which plays a simple soften blackish layer. Mirror effect allows a image to present a professional look.
When the proportion of the color isn’t right in any image, Shadow effect with Adobe Photoshop can create a drastic change so easily. Highly experienced designers create these Shadows with Adobe Photoshop According to Buyer Requirements.
Today we are going to show you how we can apply mirror effect to make a image more than realistic.After completing the editing ,object transform in totally different image.Here is a example of e transform-

Now you will be showed how this object is transform into this optimistic image
Before start to the work we have to use Clipping Path. If you miss that Article you can find it out here
Step by Step process is given below-
Mirror Effect
Step 1 : For applying mirror effect keep the main object layer and background copy layer to change the background with black color

Step 2 :Copy layer 1 and put exact under the top object layer 1
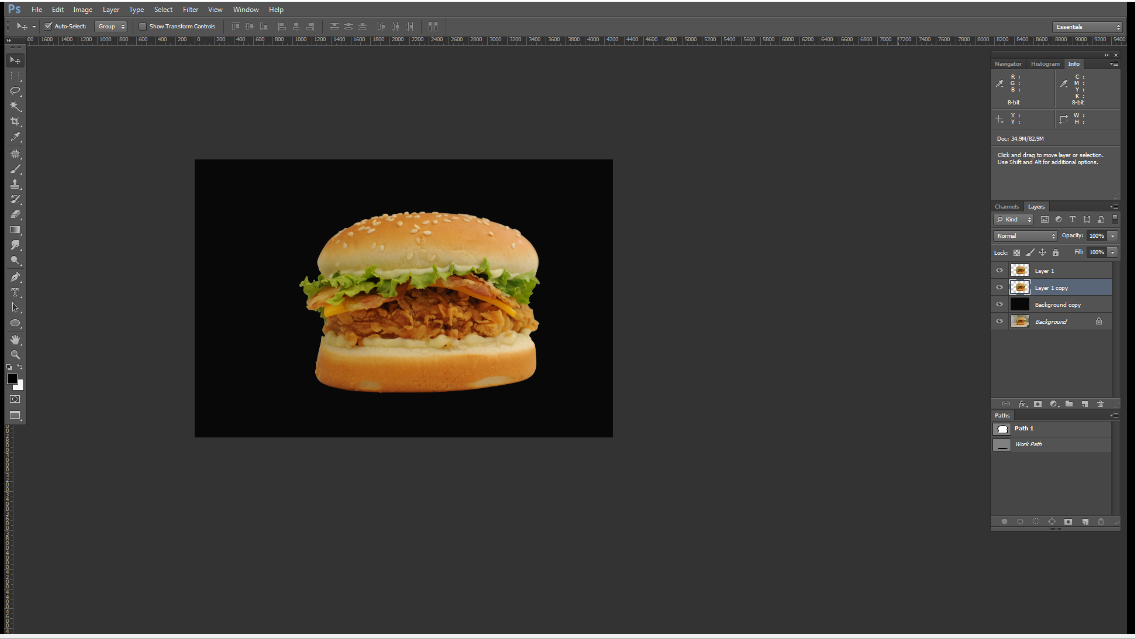
Step 3 :Select layer 1 copy to make select the object > right click > flip vertical

Step 4 :Move it down from the object to make a mirror effect

Step 5 :Now again place the layer 1 copy on the first order of the layer panel exact up before layer 1 object layer

Step 6 :Selecting layer 1 copy and adjust shadow with liquefy by pressing (shift+Ctrl+x)

Step 7 :Again replace layer 1 copy under the main object layer 1

Step 8 :Select layer 1 copy to identify the area of reflection area to scaling angle radius to give it more optimistic and original mirror look

Step 9 :Just after changing the angle decrease opacity as we need

Step 10 :Go to layer 1 again and select the bottom area of the object to copy the area in layer 2

Step 11 : Select layer 2 and change lightness effect (-100) to create drop shadow of the object more darken

Step 12 :Then go to filter > Blur > Gaussian blur > 29.1 > OK


Step 13 : Moving layer 1 copy to change the opacity level of the shadow to give the final touch to converting it into so natural outlook

Step 14 : Like the same process again press (Ctrl+E) to merge all the layer and save JPEG image

In our next session of Article, we will give you idea to adjust color of an image to giving its a professional look
Ask questions if you have necessary inquiries regarding this Blog. If you want to get more idea about photo editing you can visit Our Another Blog
Thanks to visit this Article
We will keep sharing Articles for your betterment on Graphic Design.


Most of the business could run online. So that we all need the best images to show to our clients. This blog explains great information about photo editing services. Thanks for such a great source of the blog. Visit Lirisha Image Editing Agency to get top-notch quality Image edit services in the USA.
ReplyDelete