Color Adjustment
Color Adjustment is something which can be used to transform allover color tone of the entire image. We can add or remove color on the basis of our photo requirement. Sometimes after clicking the photo, photographers can’t be satisfied with the original color of environment. With adjustment layers, we can apply edits on a different layer in the image, leaving the original image (background layer). The simplest way to adjustment layer tools is clicking an icon in the Adjustments panel. We can add more than one layer for better adjustment and complex editing. Moreover, we can also use mask to apply adjustments to a particular part of an image.
Today we going to show you how to adjust Color of any Photograph by Photoshop. Before starting procedure we giving you a example of before after photo to compare how it works actually!!

Sometimes we can use some shortcut edit tools in our devices like Mobile, Tab etc. But many thinks that edit with Photoshop to do Color Adjustment is difficult. For your wrong understanding we are giving you a short and simple idea to adjust the color of any Image
Here we use a darken image and will transform it into a bright and professional photo using Photoshop so that you can use it at any place for your promotion purpose
First we need to know with which Photoshop tools we can edit the image

Procedure of Color adjustment
Step 1: Copy object in a new layer 1 from background layer (main image)

Step 2: Go to layer 1 and select all the area without center part using lasso tool to make it inverse (Ctrl+I)

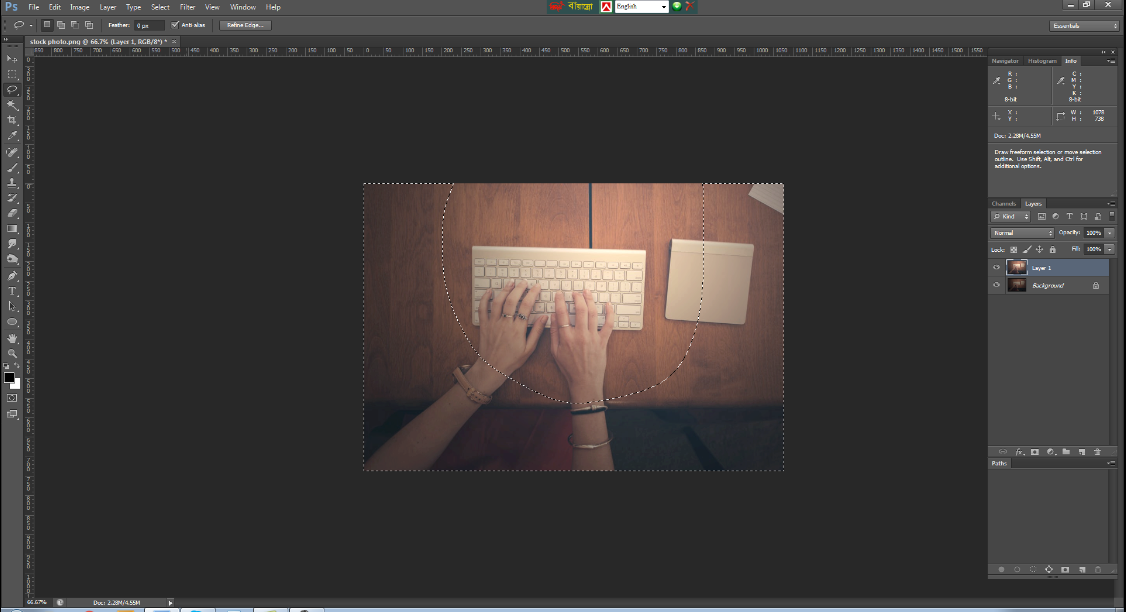
Step 3: Press (Menu bar > Select > modify > feather radius > 30% > OK). We apply feather because when we start to adjust color it will lost its originality. To keep the naturality of an image changing feather radius can make the outline so much adjustable

Step 4: Select image on the menu bar > Image > Image adjustments > Level box > adjust level. Move the input level and output level on the level slider to create the fed color into slightly darken

Step 5: Now we can press the eye symbol just left on the layer to compare the recent and previous one


Step 6: For color adjusting process the original view of object quality can disappear. We must be careful on that matter. So, to bring back the previous object color and to avoid over expose look we need to take Eraser and making its opacity level 30% to modify erasing power little less

Step 7: Slowly move Eraser on the object what we want to retouch & getting back its originality

Step 8: Select left corner of the image and change its feather radius 30%

Step 9: Immediate after go Image > Image adjustment > Level box > move slider > fix adjustments

Step 10: Here if we want to change darken side into little less darken and clear environment, we can slide input and output level to fix the level percentage we want to create

Step 11: As same process again, select right corner of the Image by lasso tool, change feather radius, and adjust level percentage due to our color adjustment with the rest of the Image environment

Step 12: If we want, we can delete or make invisible unwanted object or parts of an image. For that we can use clone stamp tool to pick a particular part of the image as a sample and retouch with that sample slowly on the object we want to remove (we have to use feather brush to take the sample )


Step 13: For applying so many tools on layer image skin color destroy its original quality and pixel

Step 14: Taking back skins natural color we can try to use some simple criteria. But before that we have to copy layer 1 to apply the further steps

Step 15: Take clone stamp tool to retouch on the skin area by decreasing its opacity and choose only soft brush to apply on skin

Step 16: Now move the brush on the skin area base on our satisfaction to give it a natural outlook around other object

Step 17: Use lasso tool for select particular area next adjustments with another part of hand skin color

Step 18: Copy selected area by press (Ctrl+c) + (Ctrl+v) on a new layer

Step 19: Apply level adjustment selecting layer 2 for giving it normal and natural look

Step 20: Take Eraser to remove unwanted area of the hands surface which has destroyed slightly

Step 21: If we notice, we will see skin looked so much glassy which should not be. Skin must be noisy to be looking perfect. On that motive, we can modify Filter > Noise > add noise > .10 > ok (which is enough)


Step 22: We know corner of the Image must have looked slightly dark than the rest of image environment. That’s why, we should take Eraser to remove the extra color of the corner area to give it little darken look and turning it so natural

In our next session of Article, we will give you idea of layer making on an image to change background


Post a Comment