site stats
Photoshop Photo Editing | Image Retouching | Background Remove | CutOut: vector
Showing posts with label vector. Show all posts

How to convert raster into a vector with Photoshop for better image quality

January 14, 2019
Vector to create better image quality


#raster #vector #raster_to_vector #raster_to_vector_conversion

#photo_conversion #vector_graphics #photo #photo_editing #photo_retouching

Click Art BD is the right destination if you need 100% handmade raster to vector conversion service. Vector tracing is another name of this service. The most important thing is if you need to expand anything like a logo or a graphic design you must need a vector file.

So it's not so much complicated if you want to convert raster image into vector. You can employ some steps and do it with yourself. To know more details Visit Here

For more interesting tutorials visit http://clickartbd.ca/clickart-blog/


Raster to vector conversion with Adobe Illustrator

July 23, 2018


Raster to Vector


We know vector is something that we can easily scale an image up or down infinite times without losing its original quality. On the other hand, the raster is something which one is working with tiny pixels.


So if we choose to maximize any raster image it’s not possible to maintain its original image quality in illustrator

Want to read full article >? Visit Our Page

Factors Should Follow to Creating Logo for Any Business

March 26, 2018


Factors to Creating Logo for Any Business


Whether you’re attempt to plan a logo manually or organize a brief for a designer, it’s very important to take a step back and think all the fundamentals that can contribute to either making or breaking it. After all, your logo in some compliments is the face of your corporation; it is what makes you outstanding.


Here is the details of these factors for creating logo-


Memorable


If a logo is not unforgettable, it can have an impact on the in general achievement of your company. The intend of a logo is to make sure people can keep in mind and remember it after just one quick look, ensure you are selected over your competitor.


Simplicity


Logo styles have very altered over the years, but one thing has always stay invariable; the best logos are always seems simple.

Brands that have mastered the art of simplicity are Nike, Apple & McDonald’s, these logos can be renowned and recalled within the blink of an eye.

Remember that logos are used in quite a few formats and size and on different stage so all the feature will be lost. Fewer colors, less text, fewer shapes, less clutter and even-spacing all promote excitability.


Contemporary


Logos should ‘stick base on the time. this does not mean it has to be ‘trendy’, there is a difference. A trendy logo will look first-class for now, but give it a year and it could look out-of-date and dull.
A contemporary logo should integrate illicit design with modern lines and spacing. This ensures it can be effortlessly updated, moving with the period of time


Innovative


It is very important that before a logo is intended, you are aware of the competition. Nobody wants to generate a very similar, almost identical logo to somebody else. It needs to be new and fresh, that way it will be effortlessly noticed and remember for anyone


Flexible


A logo will be used in many dissimilar ways, on many different platforms. Therefore it is critical that the logo you desire can be scale up and down, screen printed, overstated and more. To give some examples, your logo is likely to be printed on banners, promotional goods, business cards, fashion and alongside other business logos is magazine and flyers.

Your logo must be planned with the numerous end uses in mind, allow for all situations, no matter what color background it is on. The textures, patterns, colors and lines must all complement each other.

Your logo must have to have multiple uses in mind and allowing all situations no matter what the background color is. The texture, patterns, colors and lines must all complement each other


Thanks for visiting our article

You can visit another BLOG here


How to create background design on an illustrator

January 31, 2018


Creating background design


Now we are going to share our today's tutorial of creating background-

Step 1: Open an art board for the background design


Step 2: Place a rectangular on the art board size and paste it blue color as shape color


Step 3: Choose sky blue color on the fill color palette and select mesh tool and drag the cursor exact middle point of the rectangular. You will see a light gradient effect on the artboard shape


Step 4: Draw a shape like the image with pen tool with default color


Step 5: Select both the shape and select basic shape though it will nice rounded shape


Step 6: Again selecting shape choose the uniform as like image below and must stroke need to be 10pt


Step 7: Now you need to change the color of the default color to a white stroke color , doing fill color null


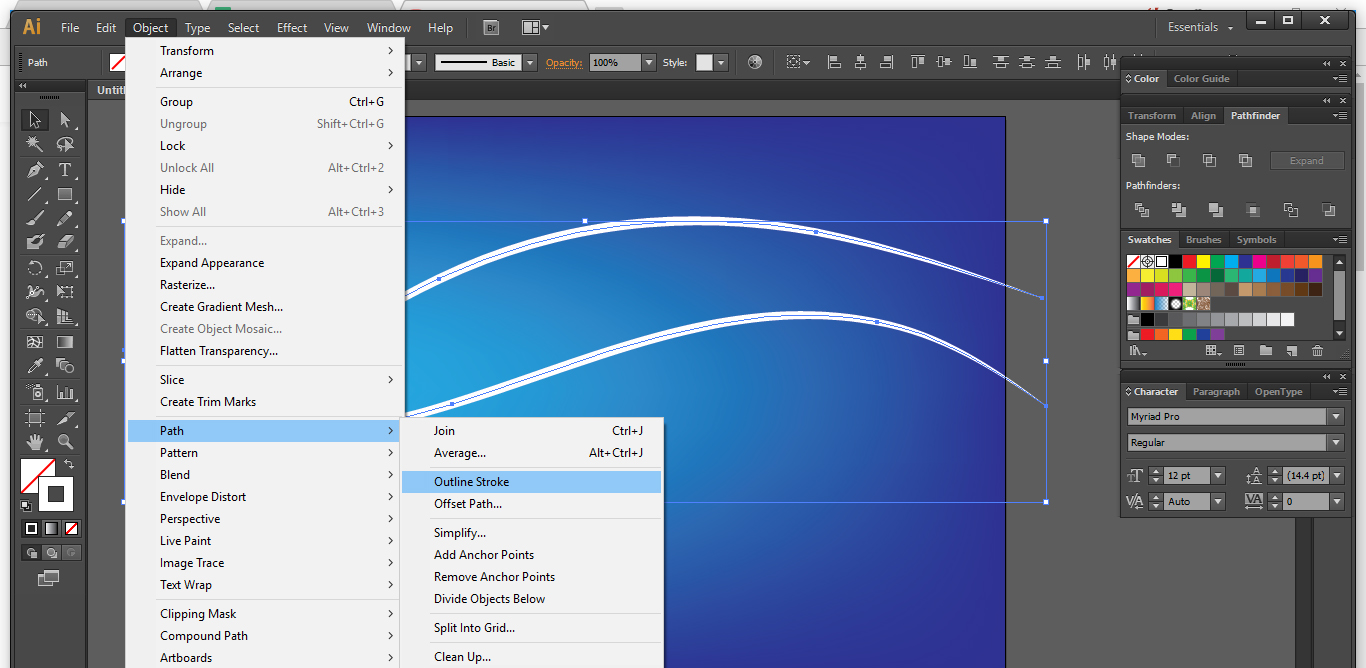
Step 8: Go to object > path > outline stroke to selecting stroke or converting stroke as a shape


Step 9: After creating the shape as a image go to effect > stylize> outer glow


Step 10: change into white color mode- normal and blur as your shape needs


Step 11: here we can see the output after applying outer glow


Step 12: Draw a shape with pen tool again likes as image below, on top and bottom of already existed shape


Step 13: go to object > blend > make to apply blend effect


Step 14: Double click on the blend tool to bring up a popup box where you need to identify the specific steps 20


Step 15: To change the specific steps color pattern go to stroke color and change the color as the image


Step 16: Draw rectangular on the art board size to cover up all the shapes under it


Step 17: select all shapes by clicking (ctrl+A)


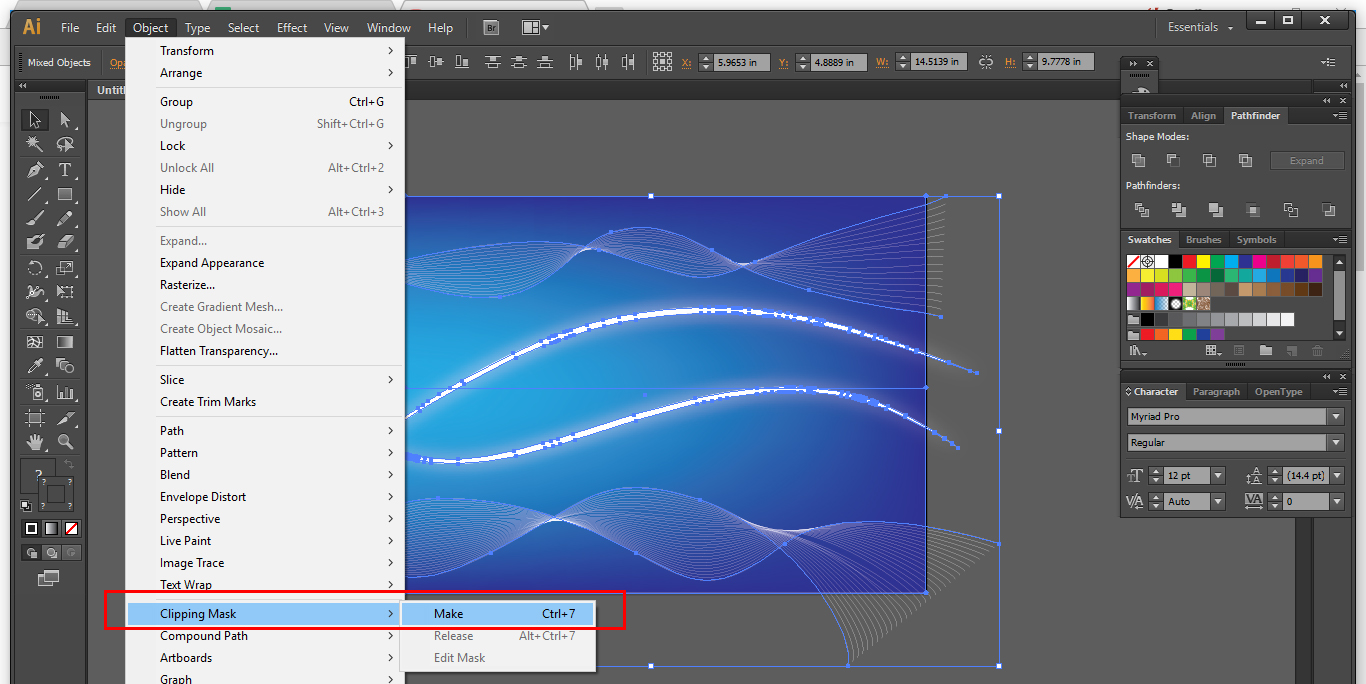
Step 18: Go to object > clipping mask > make


Step 19: we can see it already masked


Step 20: To save File > export


Step 21: Choose type JPEG


Thanks for visiting our blog


You can visit our another BLOG


How to create simple business logo with illustrator

January 27, 2018

Creating simple Business Logo


Creating Logo 


logos are symbols prepared up of text and images that assist us recognize brand we prefer. A good logo is the keystone of your brand. It help clients realize what you do, who you are and what you worth to. That’s a lot of conscientiousness on a tiny image!


possibly the most essential function of a logo is generous your business a unique mark that differentiate you from other businesses. This is particularly imperative if your business has rivalry (which 99.9% of them do). Before you obtain a logo for your business you’ll desire to investigate what your competitors’ seem like so you can place yourself.


So today we are giving you a short idea how to create simple logo using illustrator-


Step 1:  Take rectangular on any shape on the canvas


Step 2:  Then select rectangular and rasterize layer for applying color


Step 3:  Press and Hold Ctrl button and drag


Step 4:  Press Ctrl + J for duplicate the rectangular


Step 5:  Take ellipse on a landscape shape


Step 6:  Ctrl+j to duplicate layer for the ellipse


Step 7:  Press and hold Ctrl and click on circle object shape in layer for selection


Step 8:  Press delete key and place it over the rectangular


Step 9:  Place the first shape that we crop base on your design and immediate after copy layer 1 shappe by (CTrl+j) on layer 1 copy


Step 10:  change the shape color in white


Step 11:  Then move the shape exactly under the previous one

Step 12:  Again copy rectangular 1 on (layer 1 copy 2) by (ctrl + J) by duplicating it


Step 13:  Select layer ( layer 1 copy 2 ) and click over the boundary box to select wrap option


Step 14:  Manage to adjust the shape by wrapping itself base on your designed demands


Step 15:  Select shape and play gradient overlay to apply gradient effect color to highlight the finishing


Step 16:  Select rectangular 1 and apply gradient in same way as before from blending option


Step 17:  Now if you want to give perfect finishing for the shape that you draw, just adjust some drop shadow just under the layer


Step 18:  select rectangular and and give them drop shadow to adjust with all other filters


Step 19:  If you want to change your logo position and the color and text option here is the final chance where you can give a final touch


Step 20:  Save the jpeg and png file 


Thanks for visiting our BLOG

We will try our best to produce you lots of another articles and blog accordingly illustrator and Photoshop topics

You can go and visit our another Blog


How to Styling Text with Offset Path Using Adobe Illustrator

January 24, 2018

Style your Text on a background with Adobe Illustrator


Good text design is simple and direct. The text has a good structure, correct English, as well as a clear and consistent writing style with good readability. The message is comprehensible for the intended audience.Style the text on base your purpose and colorize the text style with attractive orientation.


text-styling-with-offset-path


Today here we are going to learn few simple steps to design text using offset path.


Step 1: Open the art board from top left menu bar


Step 2: Select text font from the character palette


Step 3: Take text tool and write name which you want to style on the artboard 


Step 4: Select the text and right click above to select create outline


Step 5: Then again right click and ungroup


Step 6: Now you can see every letter you can select individually 


Step 7: Apply every letter as your heart demands 


Step 8: Then for better styling you need to go object menu > path > offset path


Step 9: Ungroup the text for next steps of designing


Step 10: Select inside portions of text outline to apply different color 


Step 11: If you want to use coloring background for the text , select rectangular and right click above it to arrange it back as a background


Step 12: Choose fill color to apply color on the rectangular which is used for a text behind


Step 13: Now I think your text with background is ready to save. So that Go to file > Export > type > JPEG > OK

We will discuss a lot about illustrator and Photoshop on our next articles . Keep visit our blog.. 

Thank you for visiting our BLOG

You can visit our another Blog If you need 


Copyright © Photoshop Photo Editing | Image Retouching | Background Remove | CutOut. Designed by ClickArt Bd